Catwidget4

Headlines News :

HOW TO PROTECT YOUR COMPUTER DRIVES FROM THE AUTORUN VIRUS.

Written By WEBTECHJR on Sunday, July 4, 2010 | 4:11 AM


There is a very common virus today is the virus named itself as the autorun.inf which tends to affect the flash drives and computer drives. By default it will manipulate itself in the drive and start to corrupt and damage other file.

The easiest way to escape from this virus is to create a folder inside your flash drive or any computer drive for example drive:D and then rename that folder as autorun.inf do this to all your remaining drives and also to your flash drive since this will prevent the virus autorun.inf to be created on those drives since the computer cannot store two files with the same name in the same location then you will be probably protected from the virus.

You can share it to your friends and fellows by clicking the links bellow……….

Bookmark and Share

IMPORT PSD FILE INTO THE ADOBE FLASH CS4


For a lot of us is easy to do the design in Adobe Photoshop and then do the 2D animation in Adobe Flash now Adobe has made easier for us to transfer file from PSD to FLA so that we can animate only in flash and do all our design in Photoshop by these simple stapes.

Go to file at the middle of the drop down menu you will see an option [import] select it and several other option will appear select [import to stage] after that a pop-up window will appear which will allow you to trace the location of your PSD file in the computer ready to transfer it into FLA.

Your advised during your design arrange your layers and folders in a proper way so it is easy to adjust when importing into different tools available in Flash.For more tutorials on Adobe products click here

CREATE YOU CV IN FEW SECONDS USING MICROSOFT PUBLISHER 2007 IN FEW SECONDS


There a lot of things you can do with Microsoft publisher but among them is to create your CV not in old style were you have to waste a lot of time and energy using Microsoft world.
Now by using default template which is already made in Microsoft publisher you can just edit the color and the font together with the contents as per your requirement and the work will look more professional and sophisticated..

Just open Microsoft Publisher inside the Microsoft Office content folder in the start-up menu the welcome page will open go straight on your left hand side of the window as you go down you will see an option written [resumes] select and from there several resumes templates will appear for more advanced options click one of the resumes and you can start to edit by changing color and fonts together with the contents as per your requirements.For more tutorials on Microsoft publisher click here

You can share it to your friends and fellows by clicking the links bellow……….

Bookmark and Share

FEW THINGS YOU CAN DO WITH GOOGLE PICASA PHOTO VIEWER.


Picasa is open source software given free by Google. It is used to manage photos and images. Picasa allows arranging your pictures in albums which make easier for you to navigate through them.
Picasa also allows you to edit and do a lot of tricks and effects to your image in just few steps. Just right click your image or photograph and select open with Picasa at the bottom you will see the option to edit with Picasa.
Soon after you click it the bellow window will appear just go straight and select [effects].Inside effects you can see several options for example the picture on the window bellow was given the effect [warmfy] which make the picture to appear warm you can select several other option and you can adjust the effects using [tuning].

After you finish editing your picture there are several option on the base bar like printing, blogging the image or collage which will allow you to collage two or more photos together. The Google Picasa viewer can be downloaded at click here


You can share it to your friends and fellows by clicking the links bellow……….

Bookmark and Share

CREATE YOUR SIMPLE ADVANCED OPTION PROGRAM USING VISUAL BASIC 6.0


The advanced options such as system shutdown, system restart, notepad display and displaying the task manager can be activated and executed by using the command prompt of windows. These same commands can be used in Visual basic to create simple but powerful applications by starting with the keyword [SHELL] followed by the command in the double quotation marks for example the codes for the above application are..


Private Sub Command1_Click()
Shell ("taskmgr")
End Sub
Private Sub Command2_Click()
Shell ("shutdown/s")
End Sub
Private Sub Command3_Click()
Shell ("write")
End Sub
Private Sub Command4_Click()
Shell ("shutown/r")
End Sub


for more tutorials and tips on visual basic click here.

You can share it to your friends and fellows by clicking the links bellow……….

Bookmark and Share

HOW TO CONVERT YOUR POWER POINT PRESENTATION INTO PDF FORMAT IN MICROSOFT OFFICE 2007….


Sometimes it appears you have to submit your presentation to your boss or audience in PDF format the easiest way to do this is…

Go to the second top most bar of your window the menu bar and then click the menu option [Acrobat]. Under this option you will see three other options as per your requirement but the first one will convert the file into PDF format and ask you where you want to store the file and in case if you want to send and email it to someone ,after converting it just click the second option and automatically after conversion the pop-up window of Microsoft outlook will appear you can send and share the file with anyone.for more information on tips and tricks of POWERPOINT 2007 click here

You can share it to your friends and fellows by clicking the links bellow……….

Bookmark and Share

HOW TO INSTALL JOOMLA TO YOUR COMPUTER.

Written By WEBTECHJR on Tuesday, June 15, 2010 | 9:55 AM


Joomla is an open source software which is used for creating websites and web applications. Joomla involves developing a website without much of coding practices. We are going to check on few simple steps of installing joomla to your system and be ready to use.

Step1: Before installing Joomla to your system manually you’re recommended to install another open source application called Wamp server.wamp server is the package which involve PHP,mysql and apache all in the same package it can be downloaded at click here.

Step2: After you have downloaded the setup and click it for installation by default the wamp server will be installed in local drive c/wamp to preview the wamp server you can just type localhost to your web browser.

Step3:After wamp being installed now you are required to download Joomla from their website click here. The package will come in zip format you will have to extract the file and then transfer the folder inside the c/wamp/www.

Step4:Now our joomla website can be accessed from that location above you can rename the folder accordingly to the task you want to perform. For example if it is the college website I can decide to call the folder college.


Step5: 
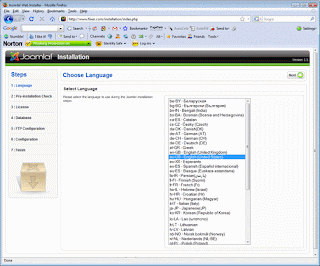
To access our site we just have to type localhost/college into our web browser and from there we can start the wizard installation

Step6: After finishing the wizard installation you will have to go and remove the folder installation from the root were we store our joomla folder we have downloaded.

Step7: After the wizard installation you will be able to access the backend by typing to the browser localhost/college/administrator since by default the front page will open by itself you might be prompted for password then you will have to supply the password you have used during installation.

You can share it to your friends and fellows by clicking the links bellow……….

Bookmark and Share

topads

tabber

sideCategory2

Content right

Content left

jrinfotech 2010. Powered by Blogger.

Content left

Content right

Content right

 
Support : Creating Website | Johny Template | Maskolis | Johny Portal | Johny Magazine | Johny News | Johny Demosite
Copyright © 2011. web technolgies jr - All Rights Reserved
Template Modify by Creating Website Inspired Wordpress Hack
Proudly powered by Free Coupons